Hello dear friends! Today, I’m thrilled to share a brand new crochet pattern just in time for the winter season. With Christmas around the corner and the colder months upon us, it’s the perfect time to start making winter-themed amigurumi. Stay tuned for even more free crochet patterns coming your way!
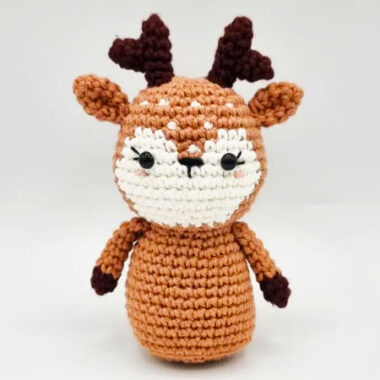
The amigurumi deer in this pattern has a simple yet charming design, with a striking head structure that catches the eye. The beautiful blend of white and brown yarn creates a harmonious and cozy look, perfect for the holiday season.
Little Christmas Deer Moose Amigurumi Pattern
I originally shared this adorable deer amigurumi years ago, and today, as winter settles in, it’s the perfect time to revisit this beloved pattern. Whether you’re making it as a Christmas decoration or a cute gift, this crochet deer will bring a festive touch to your winter.
Designer: mes.mignonneries
Materials
Cotton ricorumi : brown (056), white (001), dark brown (057), pink (065)
Crochet hook : 3mm
6mm safety eyes. You may need to use smaller/larger eyes, depending on hook/yarn size.
Yarn needle
Black embroidery thread
Fiblerfill for stuffing
Scissors
Size with the materials above will be about 10 cm.
Abbreviations
MR – Amigurumi Magic ring
sc : Single Crochet
inc : Increase
dec : Decrease
st: Stitch
dc : Double Crochet
hdc: Half Double Crochet
sl-st or Slst: Slip Stitch
ch : Chain
FLO : Crochet into front loops only
BLO : Crochet into back loops only

Head and Body
Brown: A
White: B
Stuff you go along your work.
Start in A.
Rnd 1 : MR, 6sc [6]
Rnd 2 : (inc)* [12]
Rnd 3 : (1 sc, Inc)* [18]
Rnd 4 : (2 sc, inc)* [24]
Rnd 5 : (3 sc, inc)* [30]
Rnd 6 : (4 sc, inc)* [36]
Rnd 7 : 36 sc [36]
Rnd 8 : (in A : 13 sc), (in B : 3 sc), (in A : 4 sc), (in B : 4 sc), (in A : 13 sc) [36]
Rnd 9 : (in A : 12 sc), (in B : 5 sc), (in A : 2 sc), (in B : 5 sc), (in A : 12 sc) [36]Rnd 10 : (in A : (5 sc , inc) x 2), (in B : 4 sc, inc), (in A : 2 sc), (in B : 4 sc, inc), (in B : (5 sc, inc) x 2) [42]
Rnd 11 – 12 : (in A : 13 sc), (in B : 16 sc), (in A :13 sc) [42]
Rnd 13 : (in A : 14 sc), (in B : 14 sc), (in A : 14 sc) [42]
Rnd 14 : (in A : 15 sc), (in B : 12 sc), (in A : 15 sc) [42]Insert the security eyes between Rncl 10 and 11. Before, please make the eye patches (see next page)
Rnd 15 : (in A : (5 sc, dec) x 2, 1 sc), (in B : 5 sc, dec, 3 sc, dec), (in A : (5 sc, dec) x 2, 1 sc) [36]Rnd 16 : (in A : (4 sc, dec) x 2, 1 sc), (in B : (3 sc, dec) x 2), (in A : (4 sc, dec) x 2, 1 sc) [30]
Continue in A.
Rnd 17 : in A (3 sc, dec)* [24]
Rnd 18 : (2 sc, dec)* [18]
Rnd 19 : (2 sc, inc)* [24]
Rnd 20 : 24 sc [24]
Rnd 21 : (2 sc, inc)* [30]
Rnd 22 – 24 : 30 sc [30]
Rnd 25 : (4 sc, inc)* [36]
Rnd 26 – 29 : 26 sc [36]
Rnd 30 : (5 sc , inc)* [42]
Rnd 31 : 42 sc [42]
Rnd 32 : through back loops only (5 sc, dec)* [36]
Finish to stuff.
Rnd 33 : (2 sc, dec)* [27]
Rnd 34 : (1 sc, dec)* [18]
Rnd 35 : (dec)* [9]
Rnd 36 : (1 sc, dec)* [6]
Fasten off and close. Embroider the eyelashes and muzzle with black embroidery thread, cheeks with pink one and spots with white one.
Ears (x2)
In brown.
Rnd 1: MR, 4 sc [4]
Rnd 2 : (1 sc, inc)* [6]
Rnd 3 : (2 sc, inc)* [8]
Rnd 4 – 5 : 8 sc [8]
Sew the ears on the top of the head.
Horns (x2)
In dark brown.
Big horns (2)
Rnd 1 : MR, 4 sc [4]
Rnd 2 : (1 sc, inc)* [6]
Rncl 3 – 6 :6 sc [6]
Little horns (x2)
Rnd 1: MR, 4 sc [4]
Rnd 2 : (1 sc, inc)* [6]
Rnd 3 : 6 se [6]
Sew big and little woods together.
Arms(x2)
Start in dark brown.
Rnd 1 : MR, 4 sc [4]
Rnd 2 : (1 sc , inc)* [6]
Rnd 3 : 6 sc [6]
Continue in brown.
Rnd 4- 8: 6 sc [6]
Tail
Inner part.
In white.
Rnd 1 : MR, 6 sc [6]
Rnd 2 : (inc)* [12]
Outer ears
In brown.
Rnd 1 : MR, 6 sc [6]
Rnd 2 : (inc)* [12]
At the end of Rnd 2, do not fasten off. We will now crochet the inner and outer ears together. Place the backs of the inner and outer ears together.
Rnd 3 : Continuing from the end of Rnd 2 of the outer ear, ch 1, sc in each of next 12 st through both the inner and outer ear layers.
Sew the arms and the tail to the body.


