Hello, my dear friends! Today, I’m excited to share an anime-inspired amigurumi pattern for Lion Kon, a very cute character from Bleach. This Kon amigurumi features a detailed construction guide, ensuring a smooth crafting experience for those of you who love anime-inspired crochet. You’ll find that this pattern comes with plenty of visual references, making it even easier to follow along and create your own Lion Kon amigurumi.
Crochet Lion Kon (Bleach) Pattern
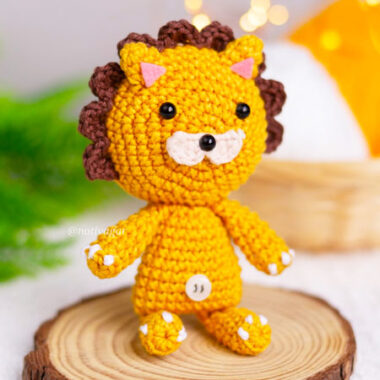
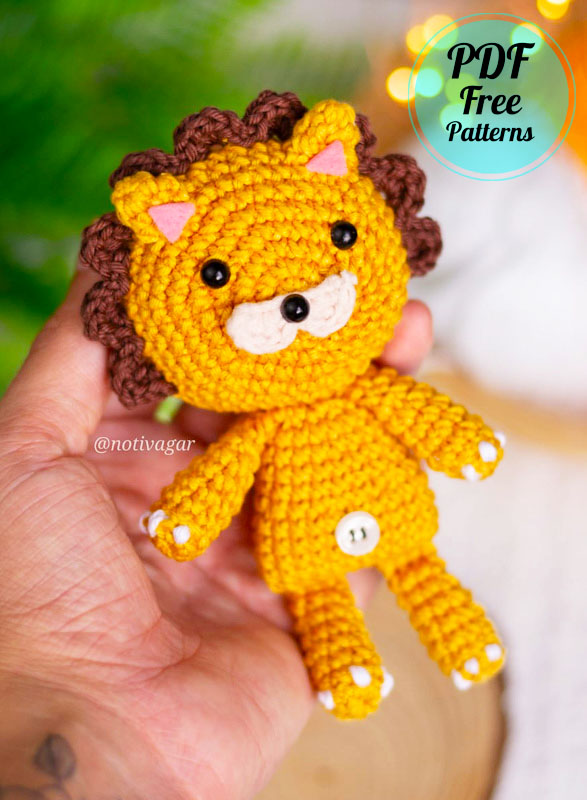
One of the most recognizable features of lion amigurumi toys is their mane, and this pattern does not disappoint! With just a few adjustments, you can transform a simple teddy bear into a fierce lion, thanks to the well-designed mane. As shown in the picture, the Lion Kon amigurumi is truly a work of art and deserves a special place in any collection.
Now, if you’re ready to bring this adorable lion character to life, download the PDF pattern and let’s get started!
Designer: Notivagar
Materials
CROCHET HOOK 2MM
TAPESTRY NEEDLE
FILLING
SCISSORS
ORANGE YARN
BROWN YARN
BEIGE YARN
BLUE YARN
WHITE YARN
BLACK SEWING THREAD
WHITE BUTTON
EYES 5MM OR HALF PEARL
PINK FELT
Abbreviations
MR – magic ring
INC – increase
INCT – triple increase
RND – round
CH – chain
DEC – decrease
DC – double crochet
SC – single crochet
SLST- slip stitch
HDC – half double crochet
BLO – Back Loop Only
HEAD
With orange yarn.
1. 6 sc in the MR [6]
2. 6 inc [12]
3. (1 sc, inc) x6 [18]
4. (2 sc, inc) x6 [24]
5. (3 sc, inc) x6 [30]
6. (4 sc, inc) x6 [36]
7. (5 sc, inc) x6 [42]
8-9. 42 sc [42]
10. (BLO) 42 sc [42]
11-12. 42 sc [42]
13. (5 sc, dec) x6 [36]
14. (4 sc, dec) x6 [30]
15. (3 sc, dec) x6 [24]
16. (2 sc, dec) x6 [18]
17. (1 sc, dec) x6 [12]
18. 6 dec [6]
Cut the yarn and finish off.

MANE
With brown yarn.
Go back in rnd 10, count 6 stitches, in the 7th stitch do:
In the same stitch: (1 sc, 1 hdc, 2 dc, 1 hdc, 1 sc) skip 1 stitch, 1 sl st in the next stitch. Go to the next stitch and repeat the same process 9x. Cut the yarn and finish off.

MUZZLE
With beige yarn.
Do 8 ch, go back from the second ch doing: 1 sc and 1 hdc together, in the next stitch make 2 dc and 1 sc together, skip 1 stitch, 1 sl st in the next stitch. Skip 1 stitch again, go to the next stitch and make 2 dc and 1 sc together, in the next stitch finish with 1 hdc and 1 sc together.

Cut the yarn and finish off. Glue the piece to the head between rounds 1 and 2.
Place the eyes on top, 6 stitches apart, and the nose.

EARS (2X)
With orange yarn.
1. 6 sc in the MR [6]
2. 6 sc [6]
3. (1 sc, inc) x3 [9]
Cut the yarn and sew the ear to the head between the 3rd and 4th mane, and the other ear between the 6th and 7th mane.
Glue a piece of pink felt to the ear.

BODY
With orange yarn.
1. Do 12 ch, go back from the second ch doing 10 sc, incT, 9 sc, inc [24]
2-5. 24 sc [24]
6. (2 sc, dec) x6 [18]
7-10. 18 sc [18]
11. (1 sc, dec) x6 [12]
Cut the yarn and sew it to the head, in the part that does not have the hair.

ARMS AND LEGS (4X)
With orange yarn.
1. 8 sc in the MR [8]
2. (BLO) 8 sc [8]
3-6. 8 sc [8]
7. (2 sc, dec) x2 [6]
8. 6 sc [6]

Put stuffing and close making 3 sc. Sew the arms between the body and head seam. Sew the legs between rnd 1 and 2 of the body (at the back).

TAIL
With orange yarn.
Make 10 ch, go back from the second chain making 9 sl st.
Cut the yarn and sew behind the body between rnd 3 and 4.
With a piece of brown yarn, place it at the end of the tail.

LAST TOUCHES
With the blue yarn, embroider the back of the doll’s head, making 1 vertical line and 1 horizontal line.
Sew a white button to the front of the body, between rnd 3 and 4.

With the white yarn, embroider the nails on the hands and feet.


 Amigurumi PDF Free Pattern)