I love sharing amigurumi toys for all skill levels, and today, I’m excited to offer a simple kitty amigurumi pattern. This adorable crochet cat is made using velvet yarn, which gives it a soft and plush appearance. The toy is small in size, making it a perfect little companion. It’s essential to use velvet yarn, as using other yarns may result in a much smaller amigurumi toy. Ready to create this cute kitty? Download the PDF pattern now and get started!
Little Kitty Martha Amigurumi Pattern
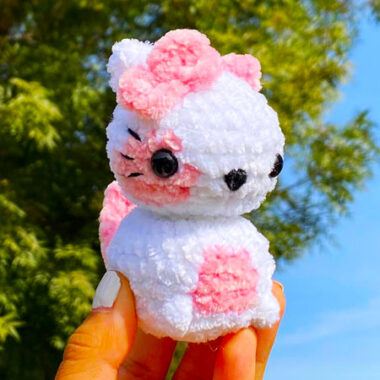
While I typically prefer more dynamic amigurumi designs, this sitting cat has a unique charm. Unlike other sitting toys that lack arms and legs, this crochet kitty features slightly highlighted limbs, adding to its cuteness and appeal.
Designer: Honeybunscrochet
Materials
• 2 colors of yarn (i used brown and white by home chenille slim)
• crochet hook (i used a 5.5mm)
• safety eyes / felt
• yarn needle
• polyfill
• Stitch Marker
Abbreviations
st: stitch
slst: slip stitch
ch: chain
sc: single crochet
inc: increase
dec: decrease
bbl: bobble stitch
blo: back loop only
mr: magic ring
fo: fasten off
Head and Body
Starting in white
R1: 6sc in a MR (6)
R2: inc around (12)
R3: (1sc, inc) (18)
R4: (2sc, inc) (24)
R5: sc around (24)
(w) = white yarn
(B) = brown yar
R6: (W) 10sc, (B) 3 sc, (W) 11 sc (24)
R7: (W) 9sc, (B) 5 sc, (W) 10 sc (24)
R8: (W) 9sc, (B) 5 sc, (W) 10 sc (24)
continue rows 9-12 in white yarn
R9: 2sc, dec (18)
R10: dec around (9)
Place safety eyes between R7 & R8, 5-6 st apart. begin to stuff head, do not f.o.
R11: inc around (18)
R12: 1sc, inc (27)
R13: (W) 17sc, (B) 5sc, (W) 5sc (27)
R14: (W) 17sc, (B) 5sc, (W) 5sc (27)
R15: (W) [3sc, dec] x3, 2sc, (B) 1sc, dec, 2sc, (W) 1sc, dec, 2sc (22)
The rest of the body will be completed in white.
R16: 13sc, bbl, 5sc, bbl, 2sc (22)
R17: BLO (2sc, dec) x5, 2sc (17)
begin to stuff the body
R18: (both loops) (1sc, dec) x5, 2sc (12)
R19: dec around (6)
FO, weave in tail
Ears x2
R1: 3sc in MR (3)
R2: inc around (6)
fold ear in half, slst across the fold.
F.o., leave a tail for sewing. Sew on ears between rows 2 & 4.
Top paws x2
R1: 4sc in MR (4)
R2: sc around (4)
Sew between rows 12 & 13 (4-5 st apart)
Tail
in Brown
ch 9
Starting in second ch from hook, sc 8.
F.o., leave a tail for sewing.
Sew tail to the center of R17 on the back of the kitty!
Nose
option 1: embroider a nose in the shape of a letter “T”
option 2: cut out a triangle out of felt.
Attach between the eyes

Whiskers
option 1: embroider 3 lines on each cheek using yarn or thread
option 2: cut out 6 small strips of felt,
attach 3 on each cheek.
Congratulations! you’ve made your own kitty:)


