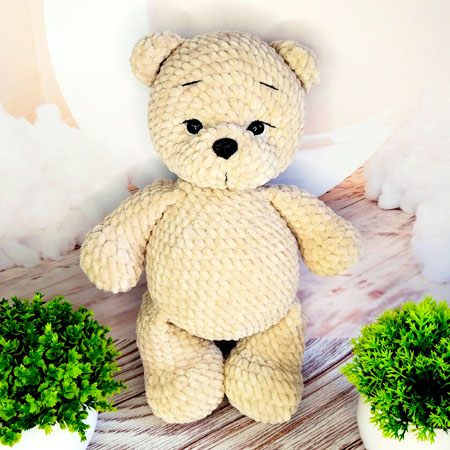
Friends, I haven’t shared a teddy bear amigurumi pattern for a long time and when I saw the amigurumi pattern of this cute teddy bear, I wanted to share it with you, my valued followers. I prepared the pattern of the toy with a translation from Russian and I did the translation as carefully as possible. I hope you like it. The details about how to tighten the nose of the teddy bear, which has a nice nose design, are explained with the support of images. Thanks to this, I don’t think you will have much difficulty making the toy.
Designer:
To create Teddy Bear you will need:
– 1.5 mats of YarnArt DOLCE yarn (#771 or 765) or any other you have.
– Hook #4
– Holofiber or synthetic fluff
– Long needle
– Scissors
– Cotton threads in the same color as the main color
– Eyes 10mm
– Nose 15mm
Abbreviations
MR: Magic Ring
st(s): Stitch(es)
sl st: Slip stitch
ch: Chain
SC: Single crochet
INC: Increase
DEC: Decrease
INC TRC: Increase Triple crochet
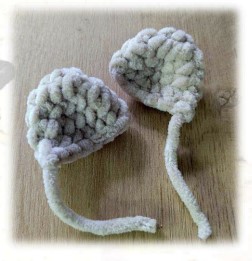
Upper paws:
1 Rnd – 6 in MR
2 Rnd – 6 inc (12)
3 Rnd – (sc, inc) *6 (18)
4-5 Rnd – 18 sc
6 Rnd – 5 sc, 4 dec, 5 sc (14)
7 Rnd – 4 sc, 3 dec, 4 sc (11)
8-13 Rnd – 11 sc (6 rnds)
Fill the piece if you need to crochet offset stitches so that the marker is in the middle of the back of the foot.
Fold the part in half and crochet 5 sc for both sides. Fasten the thread and cut.
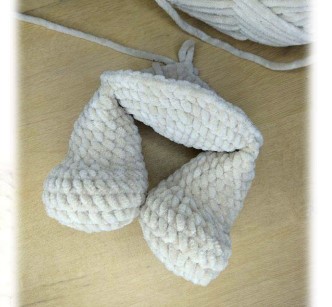
Lower paws:
1 Rnd – 5 ch, in the second loop from the hook we crochet 3 sc, in the last loop 3 sc, turn around, 2 sc, inc (10)
2 Rnd – inc, 2 sc, 3 inc, 2 sc, 2 inc (16)
3 Rnd – sc, inc, 2 sc, (sc, inc) *3, 2 sc, ( sc, inc) *2 (22)
4 Rnd – 2 sc, inc, 2 sc, (2sc, inc) *3, 2 sc, (2sc, inc) *2 (28)
5-6 Rnd – 28 sc
7 Rnd – 8 sc, 6 dec, 8 sc (22)
8 Rnd – 22 sc
9 Rnd – 7 sc, 4 dec, 7 sc (18)
10-16 Rnd – 18 sc (7 rnds)
Fill the foot with filler not to the end. Make offset loops if necessary. The marker should be in the middle of the back part of the piece. Fold the piece in half and crochet 8 sc for both sides. Fasten the thread and cut.
Tail:
1 Rnd – 6 in MR
2 Rnd – 6inc (12)
3 Rnd – 12sc
4 Rnd – 6 dec (6)
Fold the piece in half,
crochet 3sc for both sides, secure the thread and cut
Ears:
1 Rnd – 6 in MR
2 Rnd – 6inc (12)
3-4 Rnd – 12sc
Fold the piece in half and crochet 6 sc for both sides, secure and cut the thread.
Sew the ears between the 15th and 16th rows at a distance of 9 columns.
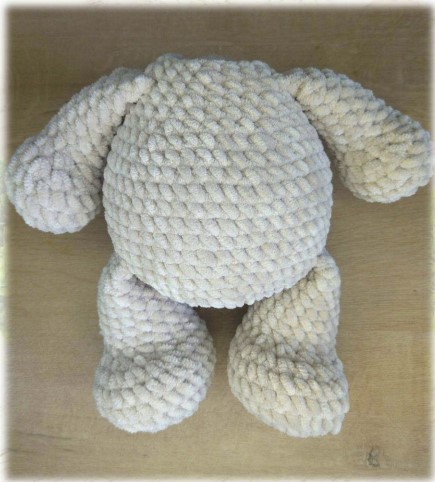
Body:
1 Rnd – 6 in MR
2 Rnd – 6inc (12)
3 Rnd – (sc,inc)*6 (18)
4 Rnd – (2sc,inc)*6 (24)
5 Rnd – (3sc,inc)*6 (30)
6 Rnd – (4sc,inc)*6 (36)
7 Rnd – (5sc,inc)*6 (42)
8 Rnd – (6sc,inc)*6 (48)
9 Rnd – 48sc
10 Rnd – 8sc, 8sc together with left leg, 16sc, 8sc together with right leg, 8sc
11 Rnd – 48sc
In the next row we will move one rnd due to the tail.
12 Rnd – 46sc, 3sc together with the tail
13 Rnd – 47sc
14-15 Rnd – 48sc
16 Rnd – (6sc,dec)*6 (42)
17 Rnd – 42sc
18 Rnd – (5sc,dec)*6 (36)
19 Rnd – 36sc
20 Rnd – (4sc,dec)*6 (30)
21 Rnd – 30sc
22 Rnd – (3sc,dec)*6 (24)
In the next row we crochet the hands.
23 Rnd – 6sc,5 sc together with hand, 7 sc, 5 sc together with hand, 1 sc.
24 Rnd – (2sc,dec)*6 (18)
25 Rnd – 18sc
Stuff the body tightly. Fasten and cut the thread.
Head:
1 Rnd – 6 in MR
2 Rnd – 6 inc (12)
3 Rnd – (sc, inc) *6 (18)
4 Rnd – (2sc, inc) *6 (24)
5 Rnd – 24sc
6 Rnd – 9sc, 6inc, 9sc (30)
7 Rnd – 9sc, (sc, inc) *6, 9sc (36)
We insert the nose between the 1st and 2nd rows. We insert the eyes between the 5th and 6th rows at a distance of 6 increases, that is, at the beginning of the first increase and at the end of the last sixth increase.

8 Rnd – (5sc,inc) *6 (42)
9 Rnd – (6sc, inc) *6 (48)
10-15 Rnd – 48sc (6 rnds)
16 Rnd – (6sc, dec) *6 (42)
17 Rnd – (5sc, dec) *6 (36)
18 Rnd – (4sc, dec) *6 (30)
19 Rnd – (3sc, dec) *6 (24)
20 Rnd – (2sc, dec) *6 (18)
21 Rnd – (sc, dec) *6 (12)
22 Rnd – 6 dec
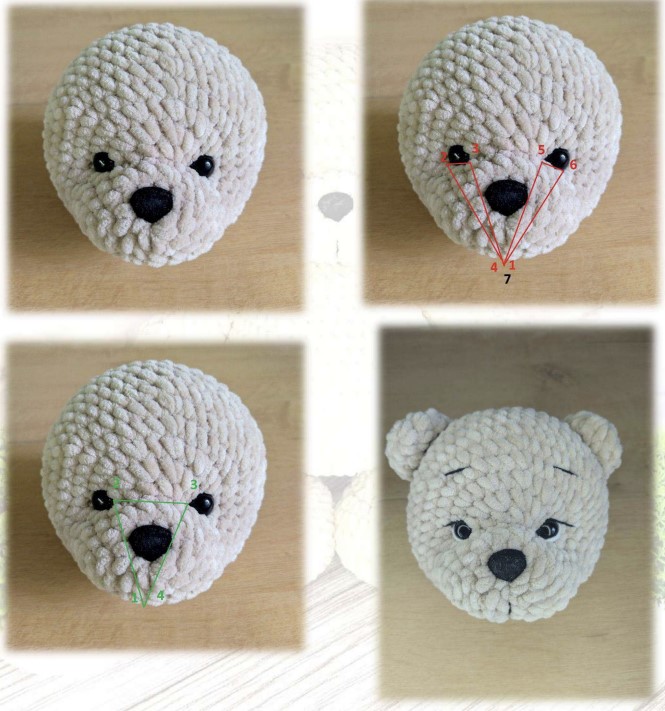
Pull the hole together, cut the thread and secure it, hide the end of the thread inside the head. Sew the head, shape the muzzle and our Teddy Bear is ready.


