This Little Dog Beachy amigurumi features a unique and realistic design, and it’s sure to catch everyone’s eye, especially with its adorable Christmas hat. What makes this toy stand out is the combination of summer accessories with the festive Christmas hat—a fun and surprising mix that reflects the designer’s creative take. If you live in South America, you’ll likely appreciate the warmth of this design, where Christmas doesn’t always mean snow or cold weather!
Little Dog Beachy with Christmas Hat Crochet Pattern
Christmas doesn’t always bring cold or snow, and this crocheted dog amigurumi is a great way to help children understand how the holiday is celebrated differently around the world. With its charming summer vibe and holiday spirit, this dog is sure to become a favorite.
Designer: nynynhass
Free PDF Pattern available for download!
Abbreviations
MR: magic ring
sc: single crochet
inc: increase
dec: decrease
sl st: Slip stitch
Materials
• Soft amigurumi yarn in light yellow
• Soft amigurumi yarn in bright yellow
• Amigurumi yarn in brown
• Crochet hook no. 2.5 mm
• Scissors
• Tapestry needle
• Eyes with lock no. 10
• Stuffing
• Pins

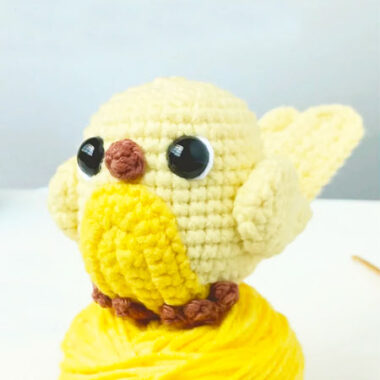
Body
With light yellow:
1. 8 sc in MR (8)
2. 8 inc (16)
3. (1 sc, 1 inc) 8x (24)
4. (3 sc, 1 inc) 6x (30)
5. (4 sc, 1 inc) 6x (36)
6 to 16. 36 sc (11 rows)
17. (4 sc, 1 dec) 6x (30)
18. (3 sc, 1 dec) 6x (24)
Place the eyes between rows 13 and 14, 7 stitches apart.
19. (2 sc, 1 dec) 6x (18)
20. 11 dec (7)
Wings
With light yellow:
1. 6 sc in MR (6)
2. 6 inc (12)
3. (1 inc, 5 sc) 2x (14)
4 to 6. 14 sc (3 rows)
7. 1 dec, 12 sc (13)
8. 1 dec, 11 sc (12)
9. 2 dec, 8 sc (10)
10. 1 dec, 8 sc (9)
11. 2 dec, 5 sc (7)
12. 4 dec
Fold in half and close with 3 sc. Make two wings.

Important
The only part that will be stuffed is the body!
Tail
In the tail, we will crochet a back and forth row, that is, when you finish a row, you
turn the piece over and start working on the wrong side. With the light yellow color:
1. 3 ch, return making 2 sc, 1 ch, turn the piece
2. 1 inc, 1 sc, 1 ch, turn 3 to 20. 3 sc, 1 ch, turn X. 3 sc, 1 ch (17 rows)
Now finish with sc around the entire tail.
Make two tails.
Breastplate
With the strong yellow color:
1. 10 ch, in the second row from the hook, go back and make 8 sc, 3 sc in the same stitch, 8 sc, 1 ch, turn the piece (19)
2. 9 sc, 4 inc, 9 sc, 1 ch, turn the piece (26)
3. 10 sc, (2 inc, 1 sc, 2 inc) 2x, 10 sc (30)
Cut the thread.
Feet
With brown:
In the magic ring, make: 3 sc, 4 ch, in the second ch from the hook, turn making 3 sc, 1 sl st in the MR, 4 ch, in the second ch from the hook, turn making 3 sc, 1 sl st in the MR, 4 ch, in the second ch from the hook, turn making 3 sc, 1 sl st in the MR. Cut the thread.
Watch the step-by-step video at @nynynhass.

Beak
With brown:
1. 5 sc in the MR
Cut and leave some thread for sewing
Assembly
Tail sewing
Place one tail on top of the other, just like in photo 1. Pin it right at the bottom of the bird, centered.
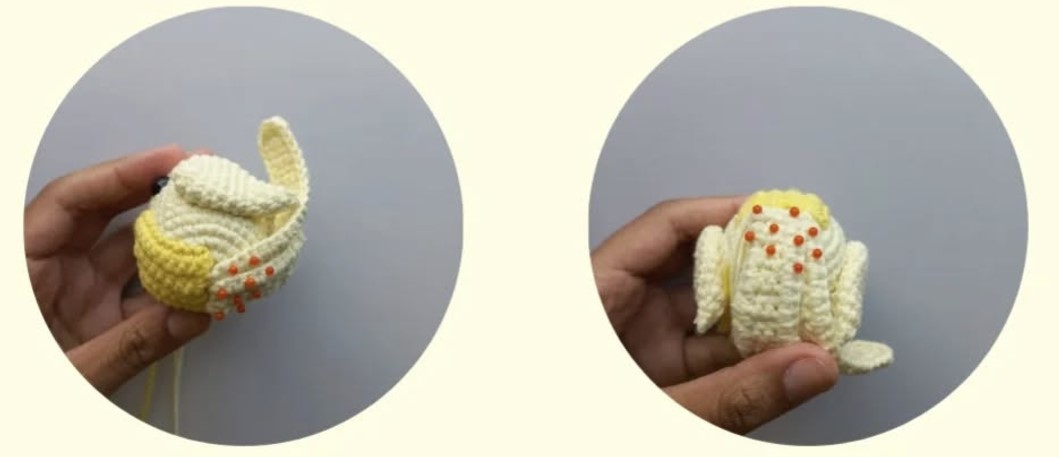
Chest sewing
Center the breastplate in front of the bird, one row below the eyes.

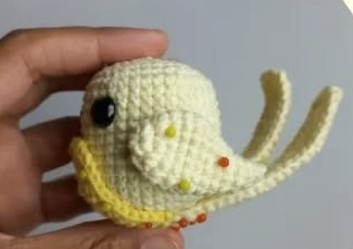
Beak sewing
Center the beak between the eyes, above the chest.
If you prefer, you can paste it.

Wing sewing
Sew the wings to the sides of the body, with the tip pointing slightly downwards.
Foot sewing
Align the feet under the bird, on top of the chest and tail.

READY!
The tweet is ready. Don’t forget to tag me so I can appreciate your work!


