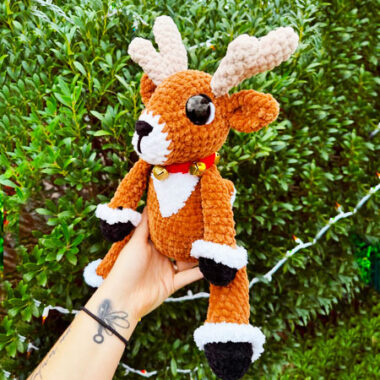
Get ready to crochet Rocket the Christmas Reindeer, a festive amigurumi toy that’s sure to bring joy to your holiday crafting! With its large, expressive eyes and majestic horns, this reindeer is a charming and detailed project. While it may take some time to complete, the effort is well worth it for such a stunning finished piece.
Rocket the Christmas Reindeer Crochet Pattern
This pattern features a white yarn accent on the chest, hands, and feet, giving the reindeer a beautifully textured look. The big eyes are a standout feature, requiring 20mm or 25mm safety eyes to capture the reindeer’s captivating expression. Don’t forget to add the final touch—a red collar—once you’ve completed your crocheted reindeer!
Designer: pixiefrogcreations
Free PDF Pattern available for download!
MATERIALS
• Size 6 Bulky Yarn
• Premier Parfait Chunky
• Faux Fur Yarn
• Premier Little Bunny
• 5 mm (H) Hook
• 20-25 mm Safety eyes
• Stitch Marker
• Yarn Needle
• Polyfil
• Scissors
• Jingle Bells (Optional)
ABBREVIATIONS
• mr: Magic Ring
• ch: Chain
• sc: Single Crochet
• hdc: Half Double Crochet
• sl st: Slip Stitch
• BLO: Back Loop Only
• FLO: Front Loop Only
• CC: Color Change
• inc: Increase
• dec: (invisible) Decrease

Arms (Make 2)
Start with BLACK
R1: 6 sc in mr (6)
R2: (1 sc, inc) x3 (9)
R3: (2 sc, inc) x3 (12)
R4: BLO sc x12 (12)
R5: sc x12
CC to BROWN
R6: BLO (2 sc, dec) x3 (9)
• Add stitch marker to first stitch, we will come back to this later for the fur
R7-13: sc x7 (9) (7 Rounds)
R14: (sc, dec) x3 (6)
Lightly stuff the hoof, stopping halfway up the arm. Do not overstuff!
R15: Fold in half, sc 3 to stitch close
Fasten off, leaving a short tail

Legs (Make 2)
Start with BLACK
R1: 8 sc in mr (8)
R2: (1 sc, inc) x4 (12)
R3: (2 sc. inc) x4 (16)
R4: BLO sc x16 (16)
R5: sc x16 (16)
CC to BROWN
R6: BLO (2 sc, dec) x4 (12)
R7-17: sc x12 (12) (11 Rounds)
R18: (sc, dec) x4 (8)
Lightly stuff the hoof, stopping halfway up the leg. Do not overstuff!
R19: Fold in half, sc 4 to stitch close
Fasten off, leaving a short tail
Make these first! They will be sewn into the body!

Body
Working with BROWN
R1: 8 sc in mr (8)
R2: inc x8 (16)
R3: (1 sc, inc) x4 (24)
R4: (2 sc, inc) x4 (32)
R5: (3 sc, inc) x4 (40)
R6: (4 sc, inc) x4 (48)
We will be attaching the legs in the next round
R7: 10 sc, attach leg with 4 sc, 20, sc attach leg with 4 sc, 10 sc (48)
• Depending on your tension you may have to adjust the legs a few stitches
R8-10: sc x48 (48) (3 Rounds)
R11: (4 sc, dec) x4 (40)
R12-13: sc x40 (40) (2 Rounds)
R14: (3sc, dec) x4 (32)
Begin stuffing, gradually adding as you go
R15-17: sc x32 (32) (3 Rounds)
R18: (2 sc, dec) x4 (24)
R19: sc x24 (24)
We will be attaching the arms in the next round
R20: 8 sc, attach arm with 3 sc, 8 sc, attach arm with 3 sc, 2 sc (24)
R21: (1 sc, dec) x4 (16)
Fasten off, leaving long tail for sewing on the head

Head
Starting with WHITE
R1: 6 sc in mr
R2: inc x6 (12)
R3: (1 sc, inc) x6 (18)
CC to BROWN
R4-5: sc x18 (18) (2 Rounds)
R6: (2 sc, inc) x6 (24)
R7: (3 sc, inc) x6 (30)
R8: (4 sc, inc) x6 (36)
R9-14: sc x36 (36) (6 Rounds) Begin stuffing
R15: (4 sc, dec) x6 (30)
If you are adding safety eyes, add between rows 11-12, about 11 stitches apart depending on size of eyes used
R16: (3 sc, dec) x6 (24)
R17: (2 sc, dec) x6 (18)
R18: (1 sc, dec) x6 (12)
R19: dec x6
Fasten off and sew closed.
Ears x2
Working with BROWN
R1:4 sc in mr
R2: (1 sc, inc) x4 (6)
R3: (1 sc, inc) x4 (9)
R4: (1 sc, inc) x4 (12)
R5-6: sc x12 (12) (Rounds)
R7: (1 sc, dec) (9)
DO NOT STUFF
Fold in half and stitch close with 3 sc
Fold in half once more and make 1 sc
Fasten off leaving a long tail for sewing
Sew evenly on sides of the head, between rows 12-13

Antlers
Part 1 (P1): MAKE 2
Working with TAN
R1: sc 6 in mr
R2: (1sc, inc) x6 (9)
R3-7: sc x 9 (5 Rounds)
Fasten off Leaving long tail
There may be a small gap between where P1 and P2 connect. Use the tail from P1 to sew close
Part 2 (P2): MAKE 2
R1: 6 sc in mr
R2-5: sc x6 (6) (4 Rounds)
DO NOT FASTEN OFF, KEEP WORKING
Join Part 2 with the beginning stitch of Part 1 with a sl st
R6: 8 sc around P1, 6 sc around P2 (14) Place stitch marker. DO NOT STUFF
R7: (1 sc, dec) x4, 2 sc (10)
R8: (1sc, dec) x3, 1 sc (7)
Fasten off, leaving long tail for sewing Sew between the ears on top of the head. Making sure P2 faces towards the eyes.
Tail
CC to WHITE when bold
R1: sc 3, sc 3 in mr (6)
R2: (inc, 1 sc, inc), (1 sc, inc, 1 sc) (9)
R3: (inc, 2 sc, inc, 1 sc), (1 sc. inc, 2 sc) (12)
R4-6: (7 sc), (5 sc) (12) (3 Rounds)
Lightly stuff
R7: (1 sc, dec) x2 sc, (dec, sc, dec) (8)
R8: dec x4 (4)
Fasten off leaving a long tail. Sew close and attach to back of body in preferred position
Chest Fluff
Using WHITE Faux Fur (or preferred yarn) We will be working in rows, not rounds.
R1: ch 9
R2: Turn, dec x1, sc 7 (8)
R3: Turn, dec x1, sc 6 (7)
R4: Turn, dec x1, sc 5 (6)
R5: Turn, dec x1, sc 4 (5)
R6: Turn, dec x1, sc 3 (4)
R7: Turn, dec x1, sc 2 (3)
R8: Turn, dec x1, sc 1 (2)
R9: Turn, dec x1 (1)
Fasten off, leaving long tail for sewing
Align to middle of chest, the long side of triangle going right at the neck line

Leg Fluff
Going back to the stitch marker we placed in R6: BLO on legs and arms Using WHITE Faux Fur
R1: HDC inc x12 (24)
Fasten off
ARMS: Repeat for R6:
R1: HDC inc x9 (18)
Fasten off
Collar (Optional)
Using RED yarn
R1: You will create a chain that is long enough to wrap around Rocket’s neck. I chained 23.
R2: Turn, in second ch from hook sc across.
Fasten off, attach both ends to create collar around the neck. I attached
jingle bells to give it some extra festive pizazz!

Nose
Using BLACK or RED yarn
Make 3-4 horizontal lines on top of one another across the center of the white on the head. The line should stretch across 4 stitches!

Make one vertical line in the center


