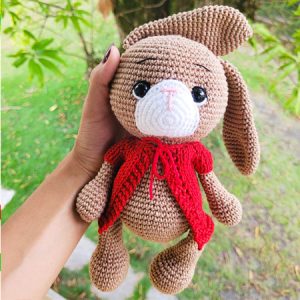

Today, I’m excited to share with you the Big Floppy Ears Bunny amigurumi pattern, featuring a charming white-nosed bunny with unique, wide, thin ears. One distinctive feature of this toy is that the ears are not stuffed, giving the bunny a soft, floppy look. Due to its larger size, this bunny takes time to complete, but the end result will be worth every stitch. Please note that the cardigan shown in the photo is not included in the pattern, but the free amigurumi pattern is available for download!
Big Floppy Ears Bunny Crochet Pattern
Although bunny amigurumi toys have become less trendy recently, they remain a popular choice for beginners. This pattern uses a combination of brown and white yarn, so it’s important to ensure your loops are symmetrical. To achieve a firm finish, make sure to stuff the toy tightly as you go.
Designer: fioreli.amigurumi
Get started on your very own Big Floppy Ears Bunny today with this free and simple-to-follow crochet pattern!
MATERIALS
2mm crochet hook
Tapestry needle
Stuffing
12mm eyes
Amigurumi yarn 7625 brown
Balloon amigo yarn white
Cléa yarn black
Abbreviations
ch: chain
sc: single crochet
sl st: slip stitch
dc: double crochet
inc: increase
dec: decrease
BLO: only in the back loops
AM: magic ring
Body and Head
1. MR with 6 sc (6)
2. 6 inc (12)
3. (1sc, 1inc)x6 (18)
4. (2sc, 1inc)x6 (24)
5. (3sc, 1inc)x6 ( 30)
6. (4sc, 1inc)x6 (36)
7. (5sc, 1inc)x6 (42)
8. (6sc, 1inc)x6 (48)
9. (7sc, 1inc)x6 (54)
10-13. (4 row) 54 sc (54)
14. (7sc, 1 dec)x6 (48)
15. 48sc (48)
16. (6sc, 1 dec)x6 (42)
17. 42sc (42)
18. (6sc, 1 dec)x6 (36)
19-22. (4 row) 36 sc (36)
23. (4sc, 1 dec)x6 (30)
24-25. (2 row) 30 sc (30)
26. (3sc, 1 dec)x6 (24)
27. 24 inc in BLO (48)
28-29. (2 row) 48sc (48)
30. (7sc, 1inc)x6 (54)
31. (8sc, 1inc)x6 (60)
32. (9sc, 1inc)x6 (66)
33. (10sc, 1inc)x6 ( 72)
34-36. (3 row) 72sc (72)
37. (10sc, 1 dec)x6 (66)
38-43. (6 row) 66sc (66)
44. (9 sc, 1 dec)x6 (60)
45. (8sc, 1 dec)x6 (54)
46. (7sc, 1 dec)x6 (48)
47. (6sc, 1 dec)x6 (42)
46. (5sc, 1 dec)x6 (36)
47. (4sc, 1 dec)x6 (30)
48. (3sc, 1 dec)x6 (24)
49. (2 sc, 1 dec) x6 (18)
50. (1sc, 1 dec)x6 (12)
51. 6 dec (6)
Finish with an inverted magic ring. Insert the eyes between rows 36 and 37, 8 visible stitches apart.

Muzzle
1. MR with 6 sc (6)
2. 6 inc (12)
3. (1sc, 1inc)x6 (18)
4. (2sc, 1inc)x6 (24)
5. (3sc, 1inc)x6 (30)
6 . (4sc, 1inc)x6 (36)
Add a little stuffing when sewing the muzzle to the head.
Arms (make 2 pieces)
1. MR with 7 sc (7)
2. 7 inc (14)
3. (6 sc, 1 inc)x2 (16)
4-7. (4 rows) 16 sc (16)
8. (2 sc, 1 dec)x4 (12)
9-21. (13 rows) 12 sc (12)
Close by joining the two sides with 6 sc. Leave a tail for sewing.
Stuff only the hands.

EAR (make 2 pieces)
1. MR with 4sc
2. 4 inc (8)
3. (1sc, 1 inc)x4 (12)
4. (2sc, 1 inc)x4 (16)
5. (3sc, 1 inc)x4 (20)
6. (4sc, 1 inc)x4 (24)
7-12. (6 rows) 24sc (24)
13. (4sc, 1 dec)x4 (20)
14-18. (5 rows) 20sc (20)
19. (3sc, 1 dec)x4 (16)
20-29. (10 rows) 16sc (16)
Finish by joining the 2 sides with 8 sc. Leave a tail for sewing. Do not stuff.

LEGS (make 2 pieces)
1. MR with 6 sc (6)
2. 6 inc (12)
3. (1 sc, 1 inc)x6 (18)
4. (2 sc, 1 inc)x6 (24)
5-9. (5 rows) 24 sc (24)
10. (2 sc, 1 dec)x6 (18)
11. (4 sc, 1 dec)x3 (15)
12-22. (11 rows) 15 sc (15)

Close by joining the two sides with 7 sc. Leave a tail for sewing. Stuff the feet only.


