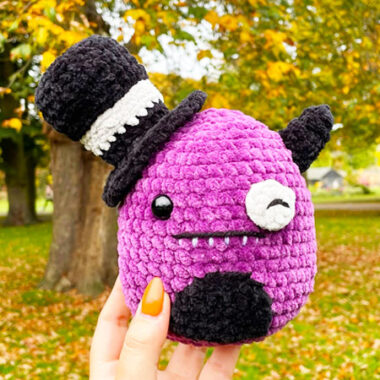
With Halloween just around the corner, it’s the perfect time to start crafting spooky yet adorable amigurumi toys. Today, I’m excited to share a super cute Squish amigurumi pattern that is perfect for the season. While this toy is meant to have a slightly spooky vibe, its charming design and adorable hat give it a lovable look.
Halloween Squish Amigurumi Pattern
This Halloween-inspired toy typically uses orange yarn, a classic color for the season, but you’ll also find a combination of purple and black to give it a fun, festive feel. However, feel free to get creative and change up the color scheme to match your own Halloween style.
Designer: goomba.crochets
ABBREVIATIONS
• MR: Magic Ring
• St: Stitch
• Ch: Chain
• SI St: Slip Stitch
• Sc: Single Crochet
• Inc: Increase
• Dec: Decrease
• FO: Fasten Off
• BLO: Back Loop Only
• FLO: Front Loop Only
• dc: Double Crochet
• hdc: Half Double Crochet
MATERIALS
• Purple yarn
• Black yarn
• White yarn
• Grey yarn Darning needle
• White & black acrylic yarn
• Stitch markers
• Crochet hook
• Stuffing
• Safety eyes

BODY
Working in purple·
R1: 6 SC in MR (6)
R2: (inc) x 6 (12)
R3: (SC, inc) x 6 (18)
R4: (2 SC, inc) x 6 (24)
R5: (3 SC, inc) x 6 (30)
R6: (4 SC, inc) x 6 (36)
R7: (5 SC, inc) x 6 (42)
R8-17: SC around (42) *10 rounds*
Add one eye between rounds 10 and 11
Stuff body
R18: (6 SC, inc) x 6 (48)
R19: (7 SC, inc) x 6 (54)
R20: SC around (54)
R21: (dec) x 27 (27)
R22: (dec x 13), I SC (14)
Finish stuffing
R23: (dec) x 7 (7)
FO, leaving a long tail for sewing. Weave your tail through the FLO of the remaining 7 stitches and pull tight to close the hole. Weave in your end.
EYE PATCH
Working in grey
R1: 8 Sc in MR (8)
SI St and FO, leave a long tail for sewing. Embroider an upside down
“u” on the eye patch with black worsted weight yarn.

HAT
Working in black –
R1: 6 Sc in MR (6)
R2: (inc) x 6 (12)
R3: 3 Sc, (inc) x 3, 3 Sc, (inc) x 3 (18)
R4: 3 Sc, (Sc, inc) x 3, 3 Sc, (Sc, inc) x3 (24)
R5: BLO Sc around (24)
R6-8: sc around (24) *3 rounds*
Color change to grey
R9: BLO Slst around (24)
R1O: BLO – [3 sc, (Sc, dec) x 3, 3 sc, (Sc, dec) x 3} (18)
Color change to black
RII: BLO Slst around (18)
RIZ: BLO – Sc around (18)
R13: FLO – Sc around (18)
R14: Ch 2, 2 dc in each st around (36)
Stuff lightly so the top stays flat. FO and leave a long tail for sewing.

BELLY
Working in black –
R1: 3 Sc in MR, Ch 1 and turn (3)
Now work in turned rows
R2: (inc) x 3, Ch 1 and turn (6)
R3: (sc, inc) x 3, Ch 1 and turn (9)
R4: 2 Sc, hdc, dc x 3, hdc, 2 Sc (9)
FO and leave a long tail for sewing

HORN
Working in black
R1: 4 Sc in MR (4)
R2: (Sc, inc) x 2 (6)
R3: Sc, 3 Slst, 2 Sc (6)
R4: (2 Sc, inc) x 2 (8)
R5: 2 Sc, 4 Slst, 2 Sc (8)
FO and leave a long tail for sewing. Stuff the horn, making sure to shape it so it curves where the Slst’s are.

ASSEMBLY
• Sew the horn on rounds 5-7
• Sew the eyepatch over rounds 9-13, with 5 stitches between the inner edge for the eyepatch and the eye
• Sew the belly patch over rounds 15- 19, centered between the eye and eyepatch
• Sew the hat so that the increases in rounds 3 and 4 are on the sides of the hat. The hat should be sewn onto rounds 2-7 of the body, opposite of the horn. Place the sts between rounds 12 and 13 so the brim of the hat is free.
• Using black worsted weight yarn, embroider a mouth between rnds 12 and 13, centered between the eye and eyepatch and about 5-6 sts wide. Use some white worsted weight yarn to embroider some teeth on round 13 as well.


