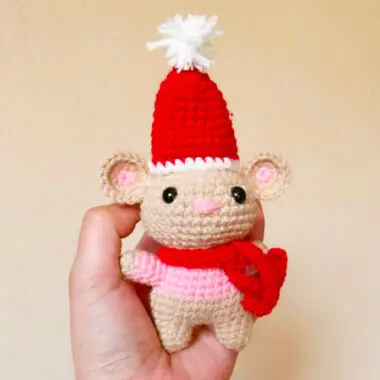
Although it’s still early for Christmas, I’m excited to share the first Christmas amigurumi pattern featuring the adorable Melvin Mouse! This delightful toy has a unique design, with the body and the inner surface of the ears made using soft pink yarn. The mouse’s nose also follows this color scheme, adding to its charm. Not to be missed is the long red scarf that gives this little mouse a festive, cozy look.
Melvin Mouse for Christmas Crochet Pattern
The pattern includes a detailed material list, making it easy to gather everything needed for this fun and festive project.
Designer: virgo.crochetdiary
Notes
• The pattern is crocheted in continuous rounds (you do not need to join each row with a slip stitch).
• Stuff as you go and ensure to shape the amigurumi to achieve the desired shape. You can gently stretch parts of the piece to match the shape in the photos.
• Use invisible decreases for a neater look.
• The technique used in this pattern is the “X” stitch for the single crochet stitch. It is up to your preference if you use “X” stitch or “V” stitch but please remember, your finished product will be slightly different from mine if you use the “V” stitch.
• This pattern can be created using any size yarn that you’d like but for a finished product that closely resembles the pattern and its size, please use the recommended yarn and hook size.
• When it comes to hook size, I always use a hook that is 1-3 sizes smaller than the recommended hook on the yarn label.
Materials
Acrylic yarn weight 4 (red, pink, beige and white)
• 3.5mm crochet hook
Safety Eyes (your choice in size)
Fiber Filling
• Darning Needle
• Scissors
• Glue
Stitch Marker
Abbreviations
MR magic ring
ch chain
st stitch
sl st slip stitch
SC single crochet
hdc half double crochet
inc increase
dec decrease
сс color change
F/O fasten off
(…) total number of stitches at the end of the round
(…) x Repeat instructions for x times
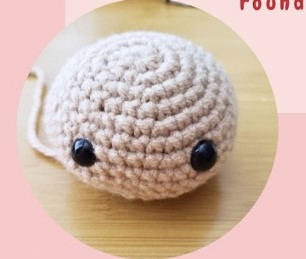
HEAD
Use beige yarn.
Rnd 1 8 sc in MR (8)
Rnd 2 inc x8 (16)
Rnd 3 (1sc, inc) x8 (24)
Rnd 4 24sc (24)
Rnd 5 (2sc, inc) x8 (32)
Rnd 6 32sc (32)
Rnd 7 (3sc, inc) x8 (40)
Rnd 8-10 40sc (40) *3 ROUNDS*
Rnd 11 (3 sc, dec) x8 (32)
Insert eyes between rounds 8 & 9 (6 stitches apart). Begin to stuff firmly.
Rnd 12 32sc (32)
Rnd 13 (2sc, dec) x8 (24)
Rnd 14 24sc (24)
Rnd 15 (2sc, dec) x6 (18)
Rnd 16 (1sc, dec) x6 (12)
F/O and leave a long tail for sewing. Finish stuffing and ensure head is nice and round.
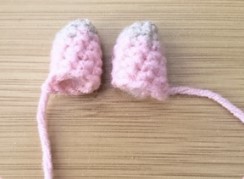
EARS
Start with pink yarn. Make 2.
Rnd 1 6sc in MR (6)
CC to beige
Rnd 2 inc x6 (12)
Rnd 3 (1sc, inc) x6 (18)
F/O and leave a long tail for sewing.

ARMS
Start with beige yarn. Make 2.
Rnd 1 4sc in MR (4)
Rnd 2 inc x4 (8)
CC to pink
Rnd 3-7 8sc (8) *5 ROUNDS*
F/O and leave a long tail
for sewing. Stuff lightly.
LEGS
Start with beige yarn. Make 2.
Rnd 1 5sc in MR (5)
Rnd 2 inc x5 (10)
Rnd 3-5 10 sc (10) *3 ROUNDS*
F/O and weave in yarn ends. Start the second leg. Once you are done, ch2 and join with the first leg (see detailed instructions on next page if you have never joined pieces before).
Rnd 6 10sc in first leg, 2sc in ch, 10sc in second leg, 2sc in ch (24)
Rnd 7 (2sc, inc) x8 (32)
Rnd 8-9 32sc (32) *2 ROUNDS*
CC to pink
Rnd 10 (2sc, dec) x8 (24)
Begin to stuff the body, starting at the legs. Continue to stuff until the end.
Rnd 11-13 24sc (24) *3 ROUNDS*
Rnd 14 (2sc, dec) x6 (18)
Rnd 15 18 sc (18)
Rnd 16 (1sc, dec) x6 (12)
F/O and weave in yarn ends.

HOW TO ATTACH THE LEGS
STEP 1: After you have completed the 2nd leg, chain 2.
STEP 2: Insert your hook into any stitch of the first leg, pull up a loop and make 1sc.
Insert your stitch marker here to mark the new round (this is the first stitch of round 6).
STEP 3: Continue to single crochet around the first leg (10 sc total this includes the first sc you made).
STEP 4: Next, you will single crochet into the chain (2sc total).
STEP 5: Continue into the second leg and single crochet all around (10sc total).
STEP 6: Lastly, you will single crochet into the chain again (2sc total).
At the end of round 6, you will have a total of 24 stitches:
10 from 1st leg + 2 from chain + 10 from 2nd leg + 2 from chain.
STEP 7: Proceed to round 7.
Note: After joining the two legs, you may end up with a gap in between the legs — you can sew this closed at the end.
SCARF
Use red yarn.
Step 1: ch 81
Step 2: In the second ch from hook, 80hdc down the chain. F/O and weave in yarn ends.
Note: You can adjust the length of the scarf to your liking by decreasing or adding more chains.
HAT
Start with red yarn.
Rnd 1 6sc in MR (6)
Rnd 2 inc x6 (12)
Rnd 3 (1sc, inc) x6 (18)
Rnd 4 (2sc, inc) x6 (24)
Rnd 5-12 24sc (24) *8 ROUNDS*
CC to white
Rnd 13 24sc (24)
F/O and leave a long tail for sewing. Do not stuff.

POM-POM
Use white yarn.
Step 1: Take your white yarn and begin to wrap it around your index and middle finger making 10 to 12 loops.
Step 2: Slip the bundle of yarn off of your fingers and lay it flat on a surface.
Step 3: Cut a piece of white yarn that is about 6 inches long and wrap it tightly around the middle of the yarn bundle several times.
Step 4: Take your scissors and snip the loops.
Step 5: Spread and fan out the pieces of yarn and trim to your liking, shaping it into a little pom-pom.
Step 6: Snip off the excess yarn ends.


