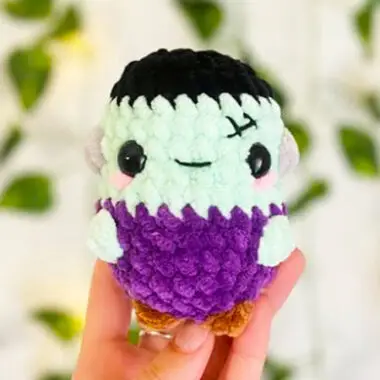
Hello and happy crafting! Today, I’m excited to share a Frankenstein-inspired amigurumi doll pattern—the Baby Frankie Monster—that requires no sewing. This adorable crochet toy is small in size but rich in detail. While the design may appear simple at first, it involves multiple colors and parts, so it’s important to follow the pattern carefully to avoid mistakes.
No-Sew Baby Frankie Monster Amigurumi Pattern
The Baby Frankie Monster crochet doll is perfect for crocheters who want to challenge themselves with a fun and unique project. Take your time with the instructions and enjoy the process of bringing this charming little monster to life without the need for any sewing!
You can also visit the designer’s Instagram profile to see test products and more inspiration.
Ready to get started? Let’s crochet!
Designer: tinkeringcrochet
Pattern is in US terminology.
The body of the pattern is no-sew, however, there are optional facial details that require some sewing.
If you have any questions please feel free to message me!
ABBREVIATIONS
BO = bobble stitch (5 loops)
DEC = decrease
FO= fasten off
INC = increase
MR = magic ring
MBO = mini bobble stitch (4 Loops)
R = round
SC = single crochet
SL ST = slip stitch
ST(S) = stitches
MATERIALS
Yarn (what I used):
Black (Premier parfait chunky in “black”)
Green (Premier parfait chunky in “mint”)
Grey (Premier parfait chunky in “fog”)
Purple (Hobbii baby snuggle in “purple”)
Brown (Premier parfait chunky in “teddy bear”)
Other materials:
Crochet hook (I use 4.5mm)
Safety eyes (I use 12mm)
Scissors
Stuffing
Stitch marker
Yarn needle
Optional materials:
Pink yarn (for blush)
Embroidery thread (for mouth/sutures)
Pattern
Begin in black yarn:
R1: 8SC in a MR (8)
R2: INC x8 (16)
R3: (SC, INC) x8 (24)
R4: SC around (24)
Color change to green yarn
R5-6: SC around (24) (2 rounds)
In the next row, you will color change to grey.
for the mini bobble stitches
R7: 6SC, MBO, 10SC, MBO, 6SC
These are the “bolts” of the head and should fall equally on either side of the head.
You may need to move the bobble stitches if they are not centered.
R8-9: SC around (24) (2 rounds)
Place 12mm eyes in between R7 & R8 with 4-5 STS in between
The eyes should each be about a stitch over from the bolts
Color change to purple yarn
R10: SC around (24)
In the next row, you will color change to green for the bobble stitches
R11: 8SC, BO, 7SC, BO, 7SC (24)
Due to changes in tension & yarn, you may need to move the BO stitches
They should fall in between the eye & the bolt
R12-13: SC around (24) (2 rounds)
R14: (2SC, DEC) x6 (18)
Begin to stuff
In the next row you will color change to brown for the bobble stitches
R15: (SC, DEC) x2, SC, BO, DEC X2, BO, DEC, SC, DEC (12)
Due to changes in tension & yarn, you may need to move the BO stitches
They should be centered and in between the “arms”
Finish stuffing
R16: DEC x6 (6)
FO, weave in any ends
Finishing Touches
The next details are optional!
You can mix and match which details you would like to do, or leave it without (all the versions are equally cute 🙂
1. Use pink yarn to sew blush underneath the eyes
2. Use embroidery thread/black yarn to sew a small mouth
3. Use the same thread to make a suture(s)
I like to place mine above the left eye


