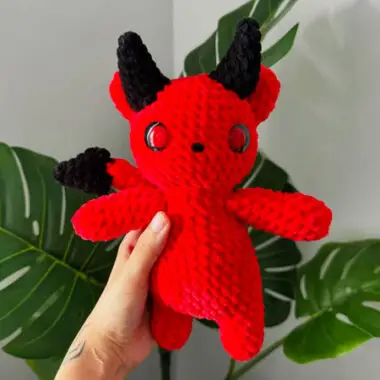
Get ready for Halloween with this spooky Amigurumi Red Devil pattern! This devil-shaped amigurumi toy is a perfect addition to your Halloween collection. Known for their eerie and fun designs, devil-themed amigurumi toys are a popular choice during the Halloween season. The Red Devil has an eye-catching design, with striking colors and intricate details, especially the red pupils in the eyes, which add a unique and eerie touch to its appearance.
Crochet Red Devil for Halloween Toy
This Red Devil amigurumi is made using two main colors. The black yarn is used for the horns and the tail, with a distinctive black tip on the tail to complete the devilish look. The pattern is simple yet striking, making it perfect for Halloween-themed crochet projects.
Ready to crochet your own Red Devil for Halloween? Let’s start crafting!
Designer: overmydeadstitches
Materials
Red chenille yarn size 6
Purple Chenille size 5 (I used Sweet snuggles skinny) 5.5 mm hook
4mm hook
tapestry needle
stitch marker
polyfil
25 mm safety eyes
10 mm safety nose or safety eye (I used an eye as my nose)
Abbreviations
sc- single crochet
ch- chain
mr- magic ring
rds- rounds
R#- round number
inc- increase
dec- decrease
Fo- fasten off
hdc- half double crochet
dc- double crochet
MC-Main color
CC- Contrast color
tw-turn work
Arms x2
Using 5.5 mm hook and MC
R1: ch 5 and sc in the 2nd ch from hook, sc in the next 3 sts and sc 4 on the opposite side (8)
R2: (sc 3, inc)x2 (10)
R3-10: sc around (10) {8 rds}
I stuffed my arm lightly but some prefer the unstuffed look so stuff on your preference:) Fo and leave a long tail for sewing!
Legs x2
using 5.5 mm hook and MC
R1: sc 5 in Mr (5)
R2: inc x5 (10)
R3-5: sc around (10) {3 rds}
Fo first leg and leave a long tail for sewing any gaps! Do not Fo the second leg, ch 4 instead!
Body
R6: after chaining 4, sc on the first leg to attach! Make 9 more sc on the first leg. Sc 4 on chs, sc 10 on second leg, sc in each of the next 4 chs (28) sew hole between legs!
R7: sc 8, (sc, inc)x4, sc 12 (32) *increases are the belly!! *stuff legs* (if you are left handed you may want to switch this round around!)
R8-12: sc around (32) {5 rds}
R13: (sc 6, dec)x4 (28)
R14: (sc 5, dec)x4 (24)
R15: sc around (24)
R16: (sc 4, dec)x4 (20)
R17-18: sc around (20) {2 rds} *stuff body*
R19: (sc 8, dec)x2 (18)
Finish stuffing. Fo and leave a long tail to sew the head to the body!
Head
Using 5.5mm hook and MC
R1: ch 7, sc in 2nd ch from hook and sc in the next 5 sts, sc 6 on the opposite side (12)
R2: (sc 1, inc)x6 (18)
R3: (inc, sc 2)x6 (24)
R4: (sc 3, inc)x6 (30)
R5: (inc, sc 4)x6 (36)
R6-12: sc around (36) {7 rds}
R13: (dec, sc 4)x6 (30)
R14: (sc 3, dec)x6 (24)
*start stuffing and add safety eyes between rds 11 and 12 7 sts apart, add safety nose between safety eyes! You can also put the nose one round down, whichever you prefer!! You can also embroider the nose!!
R15: (dec, sc 2)x6 (18)
f.o. and leave a short tail, stuff the rest of the way!
Ears x2
Using 5.5 mm hook and MC
R1: 6 sc in Mr
R2: inc (12)
R3-5: sc around (12) {3 rds}
Fo and leave a long tail for sewing!! *don’t stuff*
Tail
Using 5.5 mm hook and MC
R1: 6 sc in Mr
R2-18: sc around (6) {17 Rds} Fo and leave a long tail for sewing!! *don’t stuff*
Wings x 2
Optional!!
Using 5.5 mm hook and second CC color (I used white)
R1: ch 13 and sc in the second ch from hook then sc in the last 11 sts ch 1 and tw (12)
R2: sc 9, sc 2 and tw (9)
R3: sc in the second ch from hook then sc in the last 9 sts, ch 1 and tw (10)
R4: sc 7, ch 2 and tw (7)
R4: sc in the second ch from hook then sc in the remaining 7 sts, ch 1 and tw (8)
R5: sc 5, ch 2 tw (5)
R6: sc in the second ch from hook then sc in the remaining 5 sts, ch 1 and tw (6)
Do not fasten off instead ch 1 and rotate your work and make 3 dec across the side of your wing
Fo and leave a long tail for sewing!!
Horns x2
Using 4mm hook and weight 4 yarn
R1: sc 4 in Mr
R2: (sc, inc)x2 (6)
R3: (sc 2, inc)x2 (8)
R4: sc around (8)
R5: (sc 3, inc)x2 (10)
R6: (sc 4, inc)x2 (12)
R7: sc around (12) Fo and leave a long tail for sewing!! “don’t stuff*
Point of tail
Using a 5.5 mm hook and MC
R1: 4 sc in Mr
R2: (sc, inc)x2 (6) R3: (sc 2, inc)x2 (8)
R4: (sc 3, inc)x2 (10)
R5: (sc 4, inc)x2 (12) fold and sc 4/5 sts across Fo and leave a long tail for sewing!! *don’t stuff*
Sew point of tail to Mr of tail
Assembly
sew the arms onto either side of the body on row 19!
sew the head to the body!
sew the ears between rds 2-6 on head! Sew horns on rds 1-2
sew the tail onto rows 8-9
sew point to end of tail (optional) sew wings on rds 15-18
And you’re done I hope you love your new friend!! tag me in any makes:)!


