Get ready for Halloween with this spooky Amigurumi Red Devil pattern! This devil-shaped amigurumi toy is a perfect addition to your Halloween collection. Known for their eerie and fun designs, devil-themed amigurumi toys are a popular choice during the Halloween season. The Red Devil has an eye-catching design, with striking colors and intricate details, especially the red pupils in the eyes, which add a unique and eerie touch to its appearance.
Crochet Red Devil for Halloween Toy
This Red Devil amigurumi is made using two main colors. The black yarn is used for the horns and the tail, with a distinctive black tip on the tail to complete the devilish look. The pattern is simple yet striking, making it perfect for Halloween-themed crochet projects.
Ready to crochet your own Red Devil for Halloween? Let’s start crafting!
Designer: overmydeadstitches
Materials:
Big Twist Posh:
-Sherbert Glow
-Burnt Butter
-Lemon Meringue -Bok Choy 4mm hook
Polyfill stuffing
Stitch marker
12mm safety eyes Yarn needle
Small amount of black yarn or embroidery floss for face features
Abbreviations:
MR: magic ring
Sc: single crochet Sl st: slip stitch
Dc: Double crochet
DC 4 Cl: Double crochet 4 cluster Inc: increase
Dec: decrease
St: stitch
Sts: stitches
Rnd: round
Ch: chain
FO: Fasten off
** repeat the instructions in between the specified number of times
() total number of stitches in row or total number of rows

Hand with peace sign:
In Sherbert Glow
1. In a MR, Sc, *Ch 3, Sc 2 down the ch*, Sc into MR, repeat from * to *, Sc 4 (6)
The Sc Sts worked into the chains are the fingers. In the next round, crochet into the original 6 Sts worked into the MR. Leave fingers to the front of the work.
2. – 3. *Sc* around (6)
4. Flatten opening and Sc closed (3) FO Leaving a short tail.

Hand:
In Sherbert Glow
1. In a MR, Sc 6 (6)
2.- 3. *Sc* around (6)
4. Flatten opening and Sc closed (3) 18
FO Leaving a short tail.

Feet:
In Sherbert Glow
1. In a MR, Sc 6 (6)
2. – 4. *Sc* around (6)
5. Flatten opening and Sc closed. FO Leaving a short tail.

Vine:
In Bok Choy
1. Ch 11 & FO leaving a long tail to sew.

Stem:
In Burnt Butter
1.Ch 8, Sc 7 (7)
FO leaving a long tail to sew.

Flower:
In Lemon Meringue
1.In a Mr, *Ch 2, Dc, Ch 3, SI St to 1st Ch, Dc into MR, Ch 2, Sl st into MR* repeat from * to * 5 times total.
Pull MR closed and FO leaving a long tail. Sew to one end of vine.

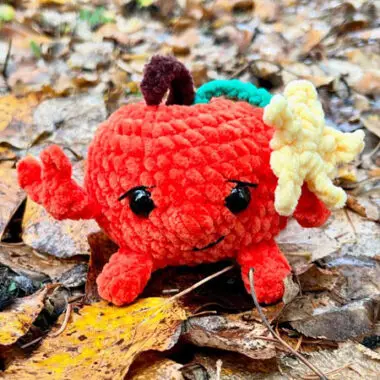
Pumpkin:
In Sherbert Glow
1. In a MR, Sc 6 (6)
2. *Sc, Inc* around (9)
3.*Inc* around (18)
Push the pointy tip down to make an indentation.
4.*Sc, Inc* around (27)
5.*Sc 2, Inc* around (36)
6.*Sc 3, Inc* around (45)
7. – 9. *Sc 8, Sl st* around. (45)
10. Sc 8, Sl st, Sc 4, through hand and body Sc 3, Sc, Sl st, Sc 4, Dc 4 Cl (nose made), Sc 3, SI st, Sc 2, through hand and body Sc 3, Sc 3, Sl st, Sc 8, Sl st (45)
DC 4 CI: *YO, insert hook into MR, YO, pull up a loop, YO, draw through 2 loops* (2 loops on hook), repeat 3 more times (5 loops on hook), YO, draw through all loops.
11. -13. *Sc 8, Sl st* around (45) Place eyes between Rnds 9 & 10 about 2 sts away from the nose on each side
14. *Sc 3, Dec* around (36)
15. Sc 12, through foot and body Sc 3, Sc 6, through foot and body Sc 3, Sc 12 (36) adjust foot placement as needed to make sure they are centered.
16. *Sc 2, Dec* around (27) Stuff. Push stuffing into the sections between Sl sts to emphasize the ridges on the pumpkin. 17. *Sc, Dec* around (18)
18. *Dec* around (9)
FO, leaving a long tail. Thread the yarn needle with the tail and weave it in and out if the front loops of the remaining Sts and pull to close. Tie and weave in end. Sew on stem and vine with flower to the top of the pumpkin. Embroider mouth and eyebrows if desired.


