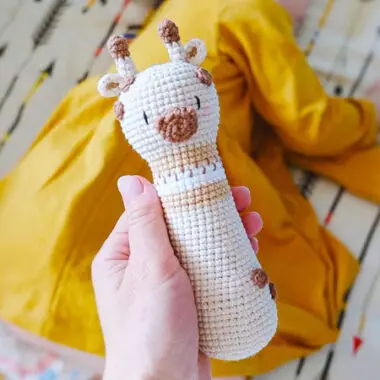

Looking for a delightful amigurumi rattle for your little one? This Crochet Cute Rattle Giraffe Marty pattern is the perfect choice! With its colorful striped design and eye-catching details, this giraffe rattle will keep your baby entertained and engaged. The big nose, tiny eyes, and pink horns make this giraffe extra adorable. Since it’s a baby toy, I do not recommend using wire for the horns to ensure it’s safe for your baby.
Rattle Giraffe Marty Amigurumi Pattern
The ears and horns of the giraffe are perfectly symmetrical, while the spots are placed asymmetrically for a playful look. Creating amigurumi rattles can be a bit challenging, but this pattern offers detailed instructions to guide you through the process. These types of crochet rattle toys have become quite rare, and I’m happy to share this giraffe rattle pattern with you!
Ready to crochet the adorable Rattle Giraffe Marty for your baby? Let’s get started!
Designer: kolibelitoys
Necessary materials
yarns:
Yarnart Jeans #05 (main color)
Yarnart Jeans #48 (stripes)
Yarnart Jeans #62 (stripes)
Alize bella #630 (face, spots)
Black yarns (to embroider eyes)
Pink yarns (to embroider cheeks)
Hook 1.75 mm
Hollofiber
Rattle 1.5 cm – 2 pcs.
Needle with a wide eye
Scissors
Abbreviations:
R: round
MR: magic ring
ch: chain
sc: single crochet
inc: increase
dec: decrease
slst: slip stitch
3dc cone: – we crochet 3 dc into one loop, there are 4 loops on the hook, which we crochet together with the 5th loop.
dc: double crochet
Rattle Base
1. 6 sc in MR (6)
2. 6 inc. (12)
3. (1 sc, inc.) x 6 times (18)
4. (2 sc, inc.) x 6 times (24)
5. (3 sc, inc.) x 6 times (30)
6. (4 sc, inc.) x 6 times (36)
7. (5 sc, inc.) x 6 times (42)
8 – 12 (5 rnds). – 42 sc around (42)
13. (1 dec., 19 sc) x 2 times (40)
14 – 15 (2 rnds). – 40 sc around (40)
16. (18 sc, 1 dec.) x 2 times (38)
17 – 18 (2 rnds). – 38 sc around (38)
19. (1 dec., 17 sc) x 2 times (36)
20 – 21 (2 rnds). – 36 sc around (36)
22. (16 sc, 1 dec.) x 2 times (34)
23 – 24 (2 rnds). – 34 sc around (34)
25. (1 dec., 15 sc) x 2 times (32)
26 – 28 (3 rnds). – 32 ряда around (32)
We fill it with stuffing and insert a rattle.
29. (14 sc, 1 dec.) x 2 times (30)
30. 30 sc around (30)
We change the color to beige, without cutting the main color yarn.

31 – 33 (3 rnds). – 30 sc around (30)
We change the color to white, we do not cut the beige yarn.
34 – 36 (3 rnds). – 30 sc around (30)
We change the color to beige, cut the white yarn, and secure the end.
37 – 39 (3 rnds). – 30 sc around (30)
We change the color to the main one, cut the beige yarn, and secure the end.
40. 30 sc around (30)
41. (4 sc, inc.) x 6 times (36)
42. (5 sc, inc.) x 6 times (42)
43. 9 sc, 1 increase, 10 sc, 1 increase, 9 sc, 1 increase, 10 sc, 1 increase (46)
44 – 51 (8 rnds). – 46 sc around (46)
52. 9 sc, 1 dec., 10 sc, 1 dec., 9 sc, 1 dec., 10 sc, 1 dec. (42)
53. (5 sc, dec.) x 6 times (36)
We insert another rattle and stuff it.
54. (4 sc, dec.) x 6 times (30)
55. (3 sc, dec.) x 6 times (24)
56. (2 sc, dec.) x 6 times (18)
57. (1 sc, dec.) x 6 times (12)
58. 6 dec, we cut the yarn.
If desired, the rattle can be decorated with simple embroidery (as on the right, top photo).
Ears (2 parts)
crochet with the main color yarns.
1. 6 sc in MR (6)
2. 6 slst, leave a yarn for sewing.

Horns (2 parts)
crochet with brown yarn.
1. 6 sc in MR (6)
2. (1 sc, inc.) x 3 times (9)
3. 9 sc around (9)
4. (1 sc, dec.) x 3 times (6)
We change the yarn color to the main one.
5 – 7 (3 rnds). – 6 sc around (6)
Leave a yarn for sewing.

Spots (5 pcs.)
crochet with brown yarn.
1. 6 sc in MR (6)
Make slst, cut the yarn, hide the ends

Nose
crochet with brown yarn.
1.6 sc in MR (6)
2. 6 inc. (12)
3. 3 sc, 3 dc cone, 3 sc, 3 dc cone, 4 sc (12)
4. 12 slst, cut the yarn.

Assembling the toy
Sew on the horns, sew on the ears next to them. Sew on the nose, with the cones facing up, stuff it a little with holofiber. Embroider the eyes on the sides of the nose, stepping back from the nose by 2 sc, on both sides.

Embroider the cheeks with pink yarn. Place and sew on the spots in any order you like.


