Embrace the cozy charm of the autumn season with this beautiful Autumn Fairy Crochet Doll pattern! As we dive into the winter months, this creative and whimsical design will spark your crochet enthusiasm. Featuring delicate details and a unique seasonal theme, this fairy is sure to be a delightful addition to your amigurumi collection.
Autumn Fairy Amigurumi Doll Pattern Details
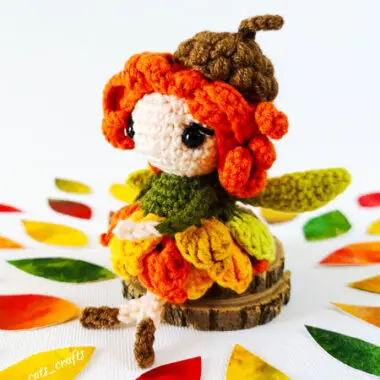
This autumn fairy has a stunning dress designed with vibrant autumn leaves as its skirt, adding a touch of nature’s beauty to the design. The only challenging part of this project may be crafting the leaf skirt, but with careful attention, you can master it.
The doll also features a lovely hat and striking red hair, along with slender and elegant arms and legs that bring the fairy to life. While this design does require some time to complete due to its intricate details, the finished result is well worth the effort.
Key Features:
- Elegant autumn-themed design
- Detailed leaf skirt for a seasonal touch
- Beautiful red hair and a charming hat
- Slender arms and legs for a delicate look
Materials Needed: Light yarn, crochet hook, and a bit of patience to complete this stunning fairy.
If you’re ready to take on a slightly more advanced amigurumi project, this Autumn Fairy Doll will be the perfect winter crochet project.
Designer: mom_cats_crafts
Happy crocheting!
Materials
sport weight yarn (I used YarnArt Jeans and Alize Cotton Gold) in next colors:
• dark green (82)
• light green (29)
• peach (73)
• brown (40)
• terracotta (85)
• yellow (35)
• mustard (84)
• orange (83)
• embroidery yarn
• black
crochet hooks 2 mm, 3 mm pair of 6 mm black safety eyes stitch markers tapestry needle
scissors
toy stuffing
pins
Abbreviations
R row/round
MR magic ring
ch chain
st stitch/es
sk skip
sl st slip stitch
SC single crochet
hdc half double crochet
dc double crochet
tr treble crochet
dtr double treble crochet
PIC picot stitch: ch 3, sl st into the third loop from the hook
PUFF puff stitch
PUFF inc puff stitch increase. 2 puff stitches in same
BLO back loop only
FLO front loop only
inc single crochet increase, 2 single crochet stitches in same stitch
dec invisible single crochet decrease
(…) X … repeat instructions in brackets for the times indicated
[…] total amount of stitches made in current round
turn turn the work at the end of a row
FO fasten off
PUFF STITCH
1. Yarn over
2. Insert your hook into the next stitch
3. Yarn over again and pull up a loop (3 loops on the hook)
4. Yarn over, insert your hook into the same stitch, yarn over and pull up a loop. Repeat these step once more (7 loops on the hook)
5. Yarn over and pull through all 7 loops on hook
6. Chain one to complete puff stitch

SKIRT
Use 2 mm hook.

Make 18 leaves. 3 leaf of each color:
terracotta, orange, yellow, mustard, light green, brown. (img 1}

BODY
Use 2 mm hook.
With dark green:
1: 8 sc in MR [8]
2: inc x 8 [16]
3: (sc, inc) x 8 [24]
4: Let’s make a skirt, by attaching leaves to the body. You should work 1 sc around BOTH leaf stitch and body stitch at the same time. Hold the leaf to the body, then insert your hook into the leaf (DON’T pull up yet), then into the body, then pull up a loop through BOTH stitches and finish your sc like normal. You should work 3 sc through each leaf.
In first row of the skirt, we will add leaves in following order: terracotta, yellow, brown, green, mustard, orange:
(3 sc through both leaf and body, sc in body only) x 5, {img 2-4}

Add 2nd row of the skirt. Add leaves in new order: mustard, orange, terracotta, yellow, brown, green:
(2 sc through both leaf of the 1st row [orange] and body,
1 sc through new leaf from 2nd row of the skirt [mustard], leaf from 1st row of the skirt [orange] and body) (img 5}
1 sc through the leaf from 2nd row of the skirt [mustard] and body [24]

5: Continue adding 2nd row of the skirt:
1 sc through the leaf from 2nd row of the skirt [mustard] and body, 1 sc in body only, (img 6}
(3 sc through both leaf and body, sc in body only) x 4, {img 7}
Add 3rd row of the skirt. Add leaves in new order: brown, green, mustard, orange, terracotta, yellow:
(2 sc through last leaf of the 2nd row of the skirt [green] and body, {img 8}
1 sc through new leaf from the 3rd row of the skirt [brown], last leaf of the 2nd row of the skirt [green] and body, (img 9})
2 sc through new leaf from the 3rd row of the skirt [brown] and body
1 sc through the body only (img 10} [24]

6: Continue adding 3rd row of the skirt:
(3 sc in leaf and body, sc in body only) x 5, 4 sc [24] {img 11}
7: (2 sc, dec) x 6 [18]
8-9: (2 rounds) 18 sc [18]
Add stuffing.
10: (sc, dec) x 6 [12] {img 12}

Don’t FO, continue to make head.
HEAD
Use 2 mm hook.
Change to peach color:
1: BLO 12 sc [12]
2: inc x 12 [24]
3: (3 sc, inc) x 6 [30]
4-8: (5 rounds) 30 sc [30]
Insert safety eyes between R6 and R7, 8 stitches apart. (img 13}
Add stuffing.

9: (3 sc, dec) x 6 [24]
10: (sc, dec, sc) x 6 [18]
11: (sc, dec) x 6 [12]
Add some more stuffing before closing.
12: (dec) x 6 [6]
FO, close
HANDS (make 2)
Use 3 mm hook.
Make a cord: 3 stitches in peach, then 7 stitches in dark green. {img 14}

LEGS (make 2)
Use 3 mm hook.
Crat
Make a cord: 3 stitches in brown, then 9 stitches in peach. {img 15}

HAIR
Use 2 mm hook.
With terracotta yarn:
1: 6 sc in MR [6]
2: inc x 6 [12]
3: (sc, inc) x 6 [18]
4: Let’s make hair strands:
(ch 16, sc in 2nd chain from the hook, 14 sc, sl st in next stitch) x 18, FO {img 16}

HAT
Use 2 mm hook.
With brown yarn:
1: 6 PUFF in MR [6]
2: PUFF inc x 6 [12]
3:12 PUFF [12]
In center:
ch6, sl st from 2nd chain from the hook, 4 sl st, FO {img 17}

WINGS (make 2)
Use 2 mm hook.

With light green yarn:
1: 6 sc in MR [6]
2: ch 11, hdc from 3rd chain from the hook, dc, 2 tr in same stitch, 2 tr, 3 dc, hdc, sk 1 and sl st in next stitch of the MR, FO {img 18}

Assembling
1. Now fairy’s eyes could be tilt towards the outside. To fix that, you need to
cut a long thread of peach yarn and pass it through the inner corners of
the eyes. Gently pull the yarn to straighten the eyes. {img 19}
2. Embroider nose between R5 and R6 of the head. 2 stitches width.
3. Embroider eyelashes. {img 20}

4. Sew arms and legs to the body.

5. Sew hair to the head, as a hat.
Sew 10 strands to the back of the head {img 23-24}
Form a haristyle from the remaining strands {img 25-28}

6. Sew hat to the head.

7. Sew wing together and attach them to the back. {img 29-31}


