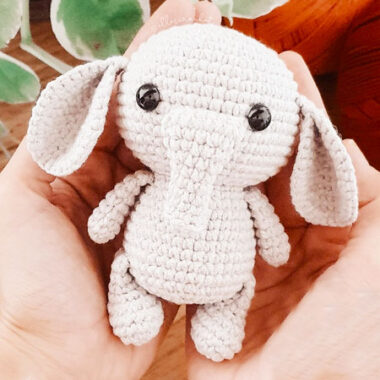
Looking for a cute and unique keychain project? The Cute Elephant Theo Keychain amigurumi pattern is the perfect solution! This adorable little elephant features a classic, large head design, but with an elegant twist. Its thin, folded ears and small arms and legs create a charming, delicate look that makes this elephant keychain stand out.
Cute Elephant Theo Keychain Amigurumi Features:
- Large head with a small body for a cute, proportional design.
- Thin, folded ears that give the elephant an elegant appearance.
- Small arms and legs that add to the toy’s charm.
- Simple, thick trunk that complements the overall design.
- Black safety eyes for a cute and expressive face.
- Perfect size for a keychain or a small decorative accessory.
This Cute Elephant Theo Keychain is not just a fun crochet project, but it also makes a thoughtful gift or a lovely addition to your keychain collection. The simplicity and elegance of the design make it a delightful crochet piece for all skill levels.
Materials Needed:
- Grey yarn for the body and ears
- Pink or grey yarn for the inside of the ears (optional)
- Black safety eyes
- Crochet hooks suitable for your yarn
- Keychain ring (optional, for creating the keychain)
Skill Level: Beginner to Intermediate
Designer: ellescrochet
Get started on your very own Cute Elephant Theo Keychain amigurumi today, and add this adorable little friend to your daily essentials! Perfect for gifting, decorating, or just adding a bit of cuteness to your keys.
Abbreviations
– MR – magic ring
– sc – single crochet
– inc – increase
– dec – decrease
– sl st – slip stitch
– ch – chain stitch
– [] – repeats
– () – number of stitches at the end of the row
Materials List
– Balloon amigo yarn in fencing color (2866)
– Eye with safety lock at 09.
– Crochet hook compatible with the chosen yarn.
– Tapestry needle.
– Stuffing.
With the materials used, Theo ended up with 10cm.
Head and body – Use the yarn in the color fencing
1) 6sc in a magic ring (6)
2) 6 increases (12)
3) [1sc, inc] x6 (18)
4) [2sc, inc] x6 (24)
5) [3sc, inc] x6 (30)
6) [4sc, inc] x6 (36)
7) [5sc, inc] x6 (42)
8) [6sc, inc] x6 (48)
9 to 16) sc around (48) – 8 rows
Eye position: the eyes with slats should be positioned between rows 12 and 13 with 9 stitches between them.
17) [6sc, dec] x6 (42)
18) [5sc, dec] x6 (36)
19) [4sc, dec] x6 (30)
20) [3sc, dec] x6 (24)
In row 21 you will work on reinforcing Theo’s neck.
21 – a) make sl st all around, picking up only the back loop of the stitches – BLO. This sequence of sl sts is not considered a row.
21 – b) sc all around, picking up the front loop of the stitch – FLO (24) Fill the head with silicone fiber.
22) sc around (24) – 1 row
23) [3sc, inc] x6 (30)
24 and 25) sc around (30) – 2 rows
26) [4sc, inc] x6 (36)
27 and 28) sc around (32) – 2 rows
29) [5sc, inc] x6 (42)
30) sc around (42) – 1 row
31) [5sc, dec] x6 (36)
32) [4sc, dec] x6 (30)
33) [3sc, dec] x6 (24)
34) [2sc, dec] x6 (18)
Fill the body with silicone fiberfill.
35) [1sc, dec] x6 (12)
Finish the piece with an inverted magic ring and hide the excess yarn in the work.
Ears – Use the yarn in the color fencing; make two pieces.
1) 6sc in a magic ring (6)
2) 6 increases (12)
3) [1sc, inc] x6 (18)
4) [2sc, inc] x6 (24)
5) [3sc, inc] x6 (30)
6) [4sc, inc] x6 (36)
7) fold the ear in half and make 3sc catching both sides of the row.
Leave a long enough thread for sewing; position the ears on the head between rows 10 and 11, sew.
Trunk – Use the yarn in the color fencing
1) 6sc in a magic ring (6)
2) [1sc, inc] x3 (9)
3) sc all around catching the back loop of the stitch – BLO (9)
4 to 7) sc all around (9) – 4 rows
8) [2sc, inc] x3 (12)
9) sc all around (12) – 1 row
10) [2sc, inc] x4 (16)
11) fold the trunk in half and make 8sc catching both sides of the row.
Leave a long enough thread for sewing; position the trunk between rows 13 and 14, sew.
Arms – Use the yarn in the color fencing; make two pieces.
1) 8sc in a magic ring (8)
2 to 7) sc all around (8) – 6 rows
8) Fold the arm opening in half and make 4sc taking both sides of the row.
Leave a long enough thread for sewing; the arms do not need stuffing. Position the arms on the side of the body, between rows 21 and 22, and sew.
Legs – Use the yarn in the color fencing; make two pieces.
In this piece we will work with the oval crochet, therefore, we will start with chains and not with a magic ring.
1) make 6 chains, go back to the second chain and work: 4sc, 3sc in the same stitch, 3sc, 2sc in the same stitch (12)
2) inc, 3sc, 3inc, 3sc, 2inc (18)
3 and 4) sc all around (18) – 2 rows
5) 4sc, 4dec, 6sc (14)
6) 2sc, 4dec, 4sc (10)
Insert the stuffing until row 6.
7 and 8) sc all around (10) – 2 rows
9) fold the leg opening in half and make 5sc taking both sides of the row.
Leave a tail long enough for sewing. Position the legs on the side of the body, between rows 30 and 31, and sew.


