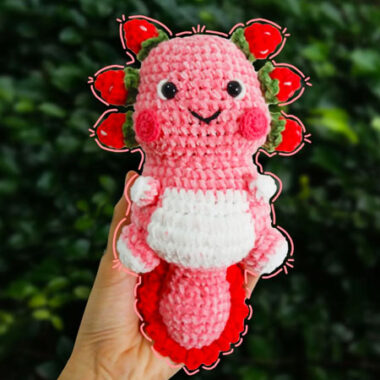
Axolotls are fascinating aquatic creatures with a unique and whimsical appearance, and today we’ll be bringing that charm to life with an adorable crochet version! This Axolotl Strawberry amigurumi pattern, designed by mo.kot.mo, features a lovely blend of pink shades that make the toy resemble a sweet strawberry. The toy is also decorated with little strawberry accents, adding even more cuteness. What makes this pattern stand out is the Axolotl’s tiny legs, giving it a distinctive look compared to other Axolotl crochet designs.
Axolotl Strawberry Amigurumi Pattern
To make this cute toy, velvet yarn is recommended for a soft and plush finish. While the brand of yarn is not specified, a 10mm safety eye and a 3mm crochet hook are suggested for the best results.
Designer: mo.kot.mo
Free PDF Pattern available for download!
MATERIALS
• Pink, Red, Green, White velvet yarn
• Small amount of black yarn for mouth
• 3mm crochet hook
• 2 black safety eyes (10 mm size) or you can crochet the eyes
• Polyester stuffing
• Yarn needle (for weaving in ends)
• Scissors
• Stitch markers (optional)
• Glue (optional)
ABBREVIATIONS (US TERMS)
• mr – magic ring
• ch – chain
• sc – single crochet
• dc- double crochet
• inc – increase (2 sc in the same stitch)
• dec – decrease (sc two stitches together)
• sl st – slip stitch
• st(s) – stitch(es)
• Rep or * – Repeat
• Rnd – Round
• BLO – back loop
• FO-fasten off
NOTE
• This Pattern follow US crochet terms
• Number of stitches indicated between “<>”. Ex. “<23 sts total>”.
• Use a stitch marker to mark the beginning of your rounds.
HEAD
• Rnd1: with pink yarn, make a mr, ch1, 8sc into the ring. Pull the ring tight, slst. <8>
• Rnd2: Ch1, inc*8, slst. <16>
• Rnd3: Ch1, [1sc, inc]*8, slst. <24>
• Rnd4: Ch1, [3sc, inc]*6, slst. <30
• Rnd5: Ch1, [2sc, inc, 2sc]*6, slst. <36>
• Rnd 6-10: Ch1, 1sc into each st around, slst. <36>
• Rnd 11: Ch1, 10sc, inc*5, 6sc, inc*5, 10sc, slst. <46>
• Rnd 12-14: Ch1, 1sc into each st around, slst. <46>
• Rnd 15: Ch1, 10sc, dec*5, 6sc, dec*5, 10sc, slst. <36>
• Rnd 16: Ch1, dec, 8sc, dec*3, 4sc, dec*3, 8sc, dec, slst. <28>

BODY
• Rnd 17: Ch1, 1sc, inc, 6sc, [1sc, inc]*6, 6sc, inc, 1sc , slst. <36>
• Rnd 18: Ch1, [5sc, inc]*6, slst. <42>
• Rnd 19: Ch1, [3sc, inc, 3sc]*6, slst. <48>
*Note: Place the eyes securely in the correct position on the head (between Rnd9-10, 6sts apart). Use white yarn for the eyes to add a bright. Use black yarn to embroider the mouth to create an expressive look. Then insert stuffing into the head to give it a full shape.

• Rnd20-21: (with pink yarn, Ch1, 19sc), (with white yarn, 10sc), (with pink yarn, 19sc) slst. <48>
• Rnd22: (with pink yarn, Ch1, 15sc, inc*4), (with white yarn, inc*10), (with pink yarn, inc*4, 15sc) sist. <66>
• Rnd23-24: (with pink yarn, Ch1, 23sc), (with white yarn, 20sc), (with pink yarn, 23sc) sist. <66>
• Rnd25: (with pink yarn, Ch1, 15sc, dec*4), (with white yarn, dec 10), (with pink yarn, dec*4, 15sc) sist. <48>
• Rnd26: Ch1, [4sc, dec]*8, slst. <40> Rnd27: Ch1, [3sc, dec]*8, sist. <32>
• Rnd28: Ch1, [2sc, dec]*8, sist. <24>
• Rnd29: Ch1, [1sc, dec]*8, sl st. <16>
*Note: Before moving forward, insert stuffing into the body for a full shape.

TAIL
• Rnd30-32: Ch1, 1sc into each st around, slst. <16>
• Rnd33: Ch1, [1sc, inc]*8, sist. <24>
• Rnd 34-36: Ch1, 1sc into each st around, slst. <24>
• Rnd37: Ch1, [2sc, dec]*6, slst. <18>
• Rnd38: Ch1, 1sc into each st around, slst. <18>
• Rnd39: Ch1, [1sc, dec]*6, slst. <12>
• Rnd40: Ch1, dec*6, slst, FO. <6>

FRILLS AN AXOLOTL’S TAIL
1. Start: Ch1 at the tail edge.
2. Frill Stitch: Work 1dc, ch2, and another 1dc in the same spot. Slip stitch to secure, then slip stitch to the next stitch along the edge.

3. Repeat Step 2: Continue this pattern around the tail edge for a wavy frill effect.
*Note: Total of 19 frill stitches around the tail edge (start between rnd 31-32). This will give the axolotl’s tail a lovely, wavy frilled effect!

LEGS
Big Part*2
• Rnd1: With white yarn, make a mr, ch1, 6sc into the ring. Pull the ring tight, sist. <6>
• Rnd2: Ch1, inc*6, slst. <12>
• Rnd3: With pink yarn, Ch 1, 1sc in the BLO of each stitch around, slst. <12>
• Rnd4: Ch1, 1sc into each st around, sist. <12>
Small Part*2
• Rnd 1: With white yarn, make a mr, ch1, 6sc into the ring. Pull the ring tight, slst. <6>
• Rnd 2: With pink yarn, Ch 1, 1sc in the BLO of each stitch around, slst. <12>
*Note: Leave a long tail for sewing.

STRAWBERRY FRILLS ON AN AXOLOTL’S HEAD *6
• Rnd1: With red yarn, make a mr, ch1, 6sc into the ring. Pull the ring tight, sist. <6>
• Rnd2: Ch1, [1 sc, inc]*3, slst. <9>
• Rnd3: Ch1, [1 sc, inc, 1 sc]*3, slst. <12>
• Rnd4: Ch1, dec*6, sl st, FO. <6>
*Note: Insert stuffing for a full shape. Use white yarn to embroider small seeds on the strawberry skin to make it resemble a realistic strawberry appearance. This simple detail adds texture and charm!.
Leaf
• Rnd1: With green yarn, make a mr, ch1, 5sc into the ring. Pull the ring tight, sist. <5>
• Rnd2: [Ch3, sist]*5, FO.
To complete the look, glue the strawberry leaves together securely before attaching them to the head of the axolotl. This will help create a polished, cohesive appearance.

CHEEK BLUSH (OPTIONAL)
• Rnd1: make a mr, ch1, 6sc into the ring. Pull the ring tight, sist. <6>
• Rnd2: Ch1, inc*6, slst. <12>
*Note: with pink milk cotton yarn- 2ply, 2mm crochet hook.

ASSEMBLY:
• Attach the six strawberry-shaped frills to the axolotl’s head by either gluing or sewing them in place.
• Sew both large and small legs onto the body.
• Embroider a mouth at the center of the face.
• Glue two small pink blush pieces onto the cheeks to add an expressive look.
• Weave in all loose ends for a clean finish.


