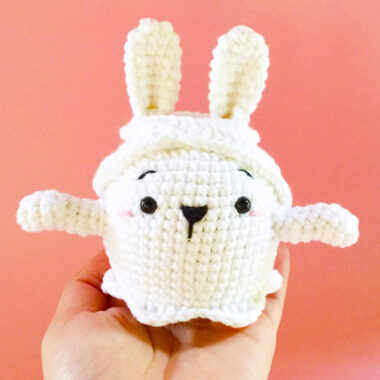
Looking for a cute and small bunny amigurumi to add to your Christmas decorations? Look no further! Today, I’m excited to share this adorable Snow White Bunny crochet pattern. This little bunny features a charming headband, tiny ears, and a sweet little nose, making it the perfect addition to your seasonal decor. The detailed instructions in this free PDF pattern ensure that even beginners can create this delightful bunny with ease.
Snow White Bunny Crochet Pattern
This snow white bunny stands out with its unique design, inspired by a ghostly theme. Its soft white color and eye-catching headband make it a perfect, whimsical decoration for the holidays. Whether you’re adding it to your Christmas display or giving it as a gift, this cute crochet bunny is sure to bring joy.
Designer: the_chloe_box
MATERIALS
Dk light Yarn (Snow, Black, Pastel Pink)
2.75mm Crochet Hook
Yarn needle
7mm Safety Eyes (1 Pair)
Stitch marker
Polyester Fiberfill
Scissors
HEIGHT
Approx. 12cm
If your using same yarns and crochet hook
STITCHES
(US Terminology)
Rnd = Round
Sc = Single crochet
Inc = Increase/
Dec = Decrease
Slst = Slip Stitch
Dc = Double Crochet
Tr = Treble Crochet
St/ Sts = Stitch/ Stitches
Ch = Chain
BLO = Back Loop Only
(…) x = Repeat instructions in the round bracket for the indicated number of times
[ ] = number of stitches in each round/ row
Head to the Bottom of the Body
(Snow)
Rnd 1: 8 Sc in magic ring. [8]
Rnd 2: (Inc) x 8. [16]
Rnd 3: (1 Sc, Inc) x 8. [24]
Rnd 4: (2 Sc, Inc) x 8. [32]
Rnd 5: (3 Sc, Inc) x 8. [40]
Rnd 6: (4 Sc, Inc) x 8. [48]
Rnd 7-18: 48 Sc (12 rounds). [48]
Rnd 19: (4 Sc, Dec) x 8. [40]
Rnd 20: (4 Sc, Inc) x 8. [48]
Rnd 21: BLO 48 Sc. [48]
Insert the safety eyes between round 10 and 11, 8 stitches apart. Start stuffing and continue as you crochet. Stuff slightly the bottom part of the body to keep it flat.
Rnd 22: (4 Sc, Dec) x 8. [40]
Rnd 23: (3 Sc, Dec) x 8. [32]
Rnd 24: (2 Sc, Dec) x 8. [24]
Rnd 25: (1 Sc, Dec) x 8. [16]
Rnd 26: (Dec) x 8. [8]
Fasten off, leaving long tail for sewing.
Close the remaining sts and tie a knot to secure the yarn. Weave in yarn end.
BODY EDGING
Using Snow yarn, work in front loops of Rnd 21.
Start in the last stitch while the head pointing towards you.
Rnd 1: (1 Sc, 1 Dc, 2 Tr, 1 Dc, 1 Sc, 2 Slst) x 6. [48]
Slst in the first st. Fasten off, weave in yarn ends.
Ears
(Make 2) (Snow)
Rnd 1: 6 Sc in magic ring. [6]
Rnd 2: (Inc) x 6. [12]
Rnd 3-9: 12 Sc (7 rounds). [12]
Do not stuff the ear. Flatten the ear and 1 Sc through both layers of the opening to close. Fasten off, leaving long tail for sewing.
Fold the ear in half and sew the sides of the last round together.
Do not cut the yarn, you will use it for sewing to the head.
Arms
(Make 2) (Snow)
Rnd 1: 5 Sc in magic ring. [5]
Rnd 2: (Inc) x 5. [10]
Rnd 3-4: 10 Sc (2 rounds). [10]
Rnd 5-6: (Inc) x 2, (Dec) x 3, 1 Sc, Inc. (2 rounds). [10]
Rnd 7: 10 Sc. [10]
Rnd 8: (3 Sc, Dec) x 2. [8]
Fasten off, leaving long tail for sewing.
Stuff the arms.
BANDAGE
(Snow)
Ch 60, Start in the 3rd from the hook 58 Hdc. Fasten off, leaving long tail for sewing.
ASSEMBLY
1. Using 2 strands of Black yarn and tapestry needle, embroider the eyebrows 2 rounds up the eyes with 8 sts apart.
Continue to sew the nose at round 11, centered between the eyes. Make a vertical line about 2 sts long below the center of the nose.
2. Using 2 strands of Pink Pastel yarn, embroider the blush about 2 sts long besides the eyes between round 11 and 12.
3. Sew ears on the top of the head on round 3 and 4.
4. Sew arms on the sides of the body between round 13 and 14. Slightly slant the arms upward.
5. Place one edge of the bandage behind the left arm and wrap it around the ears.
Forming letter X on the front center of the head. Place the other end behind the right arm. Sew-in-place.


